Butterfly Cake
With White-Chocolate Roses
This...
started as this...
My customer wanted this cake for her 69th birthday. She wears butterfly earrings, butterfly rings, and butterfly shirts, so I wanted to create something elegant and accent it with butterflies. I wanted to add a monarch butterfly since it is her favorite...however, since it has black in its wings, I felt it was too heavy a color to make as the centerpiece so I handcrafted a monarch out of gum paste, handpainted it, and added it to the back of the cake, along with a couple other simple butterflies, and saved the two prettiest ones for the front of the cake.
To make this cake:
Cover the cake board with fondant
I always cover my cake boards with fondant and let dry for at least 8 hours. I nearly always emboss my fondant with some type of pretty imprint, unless the cake design calls for a plain color. I use either a laser rolling pin or an embossing mat.
Cover cake board and edges with piping gel then add fondant
Trim cake board with ribbon
I decorate the base with a grosgrain ribbon, using a hot glue gun. (Note: If the fondant isn't dry when you start this step, the hot glue will melt your fondant!)
I don't use satin ribbon because I've found that the glue and/or piping gel shows through. So I always use grosgrain because it's thicker and has those "little lines" through it that seem to adhere better than satin. Sometimes I will not have the fondant come over the sides in the event that the ribbon is a lighter color than the fondant. Otherwise the darker color of the fondant will show through the lighter color of the ribbon.
Let fondant dry for at least eight hours then hot glue grosgrain ribbon around edges
Roses and leaves
I made modeling chocolate and turned it into these beautiful roses and leaves. I colored the white modeling chocolate using gel color.
I will tell you how in a second...
Use white chocolate, color with gel color, then shape into roses and leaves
To make modeling chocolate
For every 8 ounces of chocolate, use 1/3 cup light corn syrup.
That being said, I buy a bag of white chocolate chips from the grocery store and melt 8 ounces of that for 1 minute in the microwave, then stir. (The bags are usually 12 ounces.) I keep microwaving for short spurts until the chocolate is nearly all melted, then I add the corn syrup and stir until smooth. I work with it using a spatula then when it's smooth I scrape it into a piece of plastic wrap, wrap tightly, and store in the refrigerator. I let it come to room temperature before using, then pinch off just what I need, keeping the rest covered so it doesn't dry out.
When I'm ready to work with it, I roll out the chocolate using a small rolling pin and my confectioner's sugar, keeping my hands dusted and dry so that the chocolate doesn't stick to my hands.
Note: When working with milk or dark chocolate, you can use cocoa powder in a pouch instead of the white powdered sugar because the colors "match" better. Using it in the pouch, too, keeps it "dusty," and prevents getting little chunks of cocoa powder in your chocolate.
To make a rose out of modeling chocolate
You make a rose exactly how you would make it out of gum paste. That is, you form the cone, wrap the first "petal" completely around the cone so that the top is nearly closed, then wrap the other petals around in a 3/5/7 configuration. You can always simply just put leaves around, one right next to the other, but I prefer the 3-petal, then 5-petal configuration. I gently turn the edges of the petals over as I work with them to give them a realistic look. I add the calyx at the bottom, although this is tricky because the chocolate melts since the calyx is thin. You may have to trim off the bottom of the rose before adding the calyx...sometimes as you work with the chocolate roses, the rose base will just get longer and longer because it is very soft so just pull off the excess with your fingers and re-shape.
To make the leaves
I cut the leaves with a small metal leaf cutter. I imprint the veins using a silicone leaf press (I think the chocolate would stick to plastic) and thin the edges with a ball tool. I turn the edges slightly then place on a shaping/forming board to give the leaves movement. Unlike gum paste, which would be left out to dry...
I place everything in the refrigerator to harden
until I get ready to use them.
To make butterflies
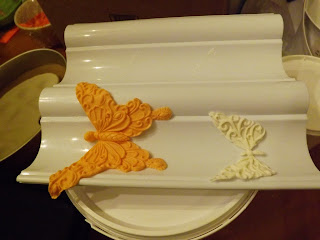
I used gum paste and a silicone mold to make these two butterflies. They are very easy to make.
Butterflies were made out of gum paste using silicone molds
After they were dry to the touch, I used shiny petal dust on both butterflies, then glued edible pearls onto the white butterfly (using edible gum glue made from gum paste and water).
After the butterflies were dry, I dusted with petal dusts
I used edible gum glue to add edible pearls to this butterfly's wings
Finishing the Cake
I found that with the petal pans (my first time using them), it was hard to get the buttercream smooth around the corners. I tried it five times and the cake kept showing through so I finally just gave up. Instead of smooth buttercream, I added the draping effect, which turned out prettier anyway!
I used a reverse shell border at the bottom of the cake
(This is my absolute favorite cake border...it's so elegant!!)
And here is the final product. Happy baking!
Questions? Email me at:
Thanks for looking!


No comments:
Post a Comment