How to Make an Artist Cake
When designing a cake, get
clear in your mind what you want the finished product to look like then sketch
it out using colored pencils. For my Artist Cake, I wanted to include an edible painter's palette, edible
brushes, and an edible picture frame and "painting." I took
a real palette and picture frame and played with different-sized cake boards
and cake pans until I found a look I liked, then made a rough sketch to refer to.Playing with different shapes of pans, cake board sizes, etc...
Left: This is the actual finished gum paste palette I made for the cake. I simply covered a real palette with gum paste, cut away the excess, and let dry. (Details below)
The
main tools needed for this exact cake–
A 14”-square cake board (in picture above, left), an oval pan, an
inexpensive plastic artist’s palette, purchased at Michael’s for fifty cents after the coupon : ), a silicone picture frame mold that I bought on
eBay, and an image of the artist ( turned into an edible image "painting" and framed in the edible chocolate frame). Note: the palette, paintbrushes, and frame can be made from gum paste or modeling chocolate, and if you know how to make your own molds, you can do that using a picture frame and holder. from eBay; and picture of artist
Palette –
The first thing I did was to liberally dust the plastic palette with powdered sugar. You can also use cornstarch or a mixture of 50/50 powdered sugar/cornstarch. Using a rolling pin, I rolled the white gum paste to a medium-to-thin consistency and placed gently overtop the palette. I pressed carefully, making indentions in the gum paste (where the paint would go on a real palette).
I put the palette in my hand and placed a flat surface face-down on top of the palette. (In this instance, the green tray, below, was that "flat surface"). Holding against each other somewhat firmly, I flipped the green pan and palette over so that the palette was now upside-down. Laying everything down, I held the palette down with one hand and used a pizza cutter to cut away the excess gum paste from the edge of the palette with the other. I then trimmed any details with an Exacto knife. I flipped the tray and palette back over, then used an the Exacto knife to cut a finger hole in the palette and clean up any edges. Use your fingers to gently smooth any edges and voilà!
You now have a beautiful palette!
Let this dry at least eight hours before using
Paintbrushes
–
Next,
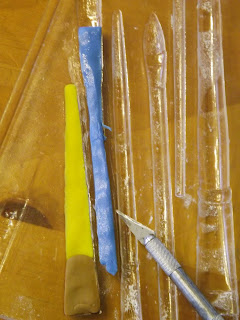
I used gum paste for the paintbrushes but as I stated before, you can also use modeling chocolate.
I generously dusted the paint brush mold with powdered sugar and tapped the excess off.


I next rolled pieces of colored gum paste into long, thin lines and put each into the paint brush mold, one at a time, shaping with my fingers and when necessary, trimming with the Exacto knife. Make sure you keep all gum paste covered securely when not using or it will dry out quickly
I tried to be as neat as possible when putting the gum paste inside the mold but the sides stayed a little rough. If this happens, put a little vegetable shortening on your fingers to smooth the edges while the gum paste is still pliable. Remove from mold as soon as possible then let the brushes dry on a dusted surface for at least three days until they're hard. You can use an edible food writer to write on these. You can also use an extruder for the detail work, if desired.
Frame and Easel –
Since I wanted a gold frame and easel, I colored the modeling chocolate with a beige color, which turned it a light yellow.
I put the modeling chocolate in the molds, refrigerated until hard, then popped them out. To attach the easel sides to each other, I microwaved a little of the colored modeling chocolate and piped it down the inside of the easel pieces and attached together. (It was hot, be careful!)
Take the chocolate out of the mold and attach easel together using almost liquid chocolate
(I microwaved it and piped it on)
I spray-painted the frame and easel with Duff edible gold spray. After this was dry, I hand painted the frame with a gold edible paint. You can also take gold pearl dust and mix with a little alcohol to make gold liquid paint. (Alcohol or lemon juice mixed with the dry dust works better than water because it dries more quickly than if you used water to mix.)
I spray painted the easel and frame with edible gold paint (Duff, here)
After the edible spray paint was dry, I hand painted with gold edible paint
then put back in the fridge until ready to use
Image –
I
uploaded a free Photoshop program that I found online; it changes an image so that it looks like a
watercolor picture. I printed it out and re-sized it so it would fit with the size of the edible frame. I took
that image to a bakery that prints pictures onto edible image "paper" and cut to fit. I attached to the back of the frame using piping gel.
I used Photoshop to give the photo a watercolor look
I took the "watercolor" printout to a bakery and had an edible image made.
I cut it down to size and used piping gel to "glue" it to the back of the frame.
Last – the fun part!
Put a little piping gel on top of the cake to attach the palette. The "paint" on the palette is simply white icing with colors mixed in. Add brushes and the picture in the frame to the cake board.
Now you know how to make
an Artist’s Cake!


No comments:
Post a Comment