My customer's little boy, Caleb, was turning two and he loves trucks!
The order called for a cement mixer, crane, dump truck, and garbage truck. There were all made out of gum paste about a week before the cake was due.
I also made two small construction cones and some "holders" for candles, plus a number "2." I made an extra candle...you never know when one breaks and you need an extra!!
I saw a tutorial online about how to make a cake that looks like construction stripes:
I decided that a topsy turvy cake suited this design the best. If you are new to making topsy turvy cakes, bake extra layers of cake because you will lose a LOT of cake once you start carving...and you don't want the cake too look "squatty," you want it to still have height once you are finished cutting. Usually my cakes are 4" in height and takes 3 layers of cake. For the bottom cake, here, I made 4 layers of cake. For the top cake, I used 6 layers, which was very tall but it was the design I wanted.
First, chill the cakes then level them. Afterwards, because it was going to be a topsy turvy and would be carved down, the cakes needed to be really hard. Wrap the individual layers of cakes tightly then put in the freezer until hard. Then stack the cakes and carve while still very cold. This does two things: it helps you to cut the cake easier without ripping it, and it keeps the cake from having tons of crumbs coming off. But don't put the outside layer of buttercream on before you carve because that will cause a mess with warm hands!!
After crumb-coating, cut a large hole out of the middle of the cake to fit the top cake down into (but don't cut too deep down). Make sure the hole that you carve is larger than the cake base of the small cake. The small cake will have about three coats of buttercream plus fondant, which will "bulk" it up, and you want it to fit into the hole of the larger cake afterwards!
Dowel the bottom cake to support the top cake.
bottom tier (four 10" round cakes, cut down)
I did not go crazy making this cake "even" because it was going to be a construction-themed cake and I knew that uneven surfaces would be fine
top tier (six 6" round cakes, cut down)
This, above, was almost too steep. The first layer of fondant ripped at the top corner and I had to start over again with another piece of fondant. This time I smoothed the fondant down on that corner before I moved on to the rest of the cake.
Bottom cake covered in fondant
Top cake when first covered in fondant
Stacked cake
I ran a sharpened dowel down the middle of both cakes and into the cake drum to secure it so it wouldn't topple over when I delivered it. I only had to hear that horror story once from a fellow cake decorator about not doweling a wedding cake and then the cake slid apart during the drive to the venue...I decided then and there that it would be forever worth the extra five minutes to dowel!!!
With buttercream, I filled in the hole that the dowel left on the top cake then covered it with a yellow circle of fondant, purely for aesthetic reasons
Using piping gel, I piped a line between cakes and added chocolate rocks as an awesome border.
Once on-site, I added the trucks. Here is the cement mixer, plus the chute and "cement" (gray buttercream)
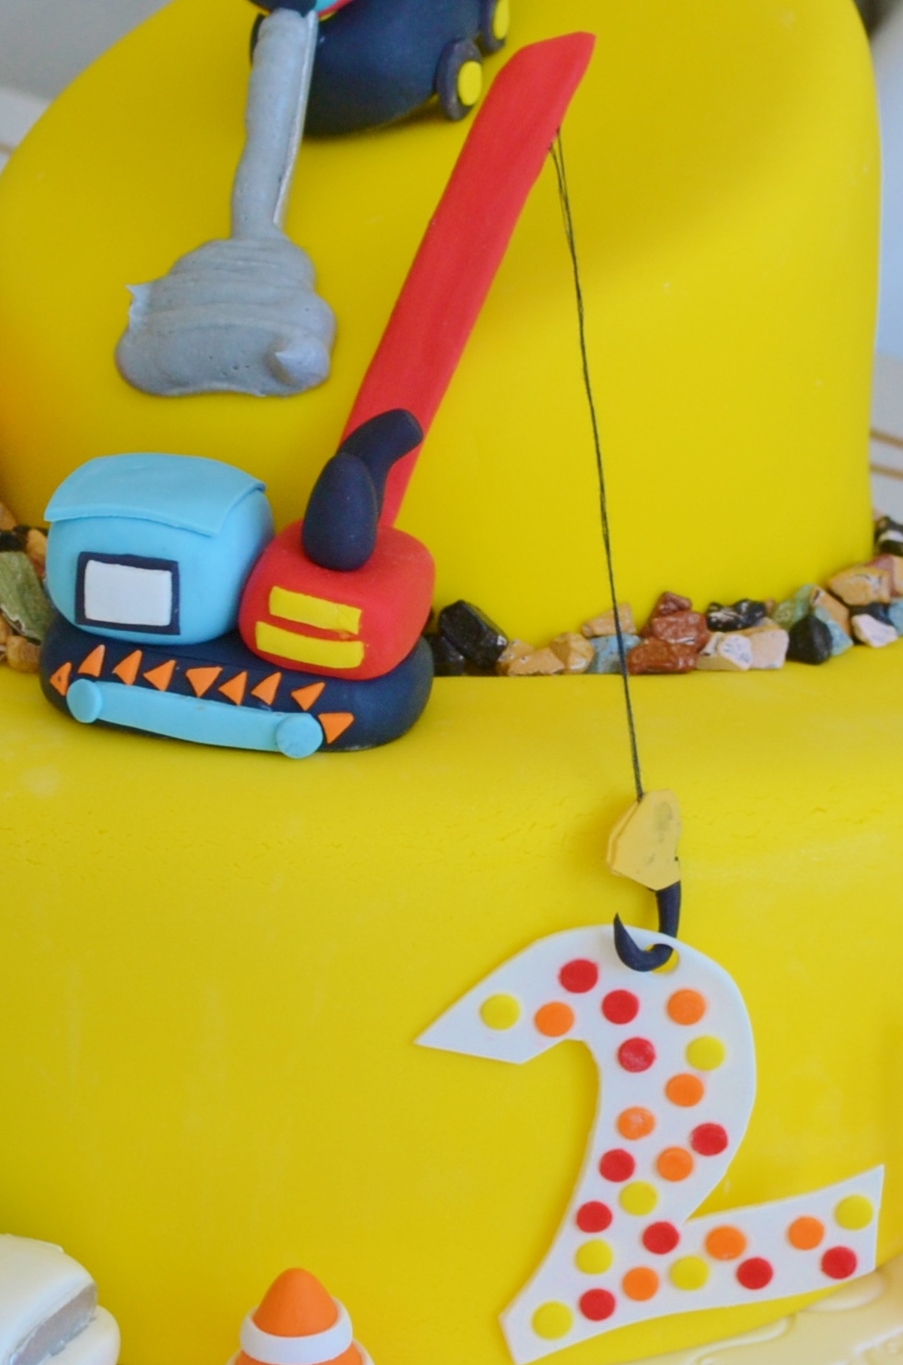
Here is the crane. The trick with this was to make the crane "arm" around a thin dowel, then make a hole the size of that dowel on the inside part of the crane base. I was then able to run the crane arm down through the hole and into the cake to secure.
Do you like how the crane is lifting the number 2 into place? I thought that was rather clever, if I do say so myself! ; )
Here is the little dump truck, filled with chocolate rocks. I used some piping gel inside the truck bed to hold the rocks into place, plus put some piping gel onto the cake to secure the rocks there, too
Garbage truck
Once I arrived, there was a crack in the top of the lower cake. I covered it with piping gel, ran the gel down the side of the cake and onto the cake drum, then used Oreo crumbs to the gel to stick. It looked like dirt coming down.
Detail work:
And here it is, a Construction Cake for little Caleb. Happy 2nd birthday, Caleb! See you next year!